Whether your roof shingles have just suffered strong storm damage or are in the preliminary stage of roof leakage, it becomes a race against time to cover the leaks as soon as possible as the roof damage repairs can quickly turn to be exorbitant.
Roof tarping is one of the quickest solutions. Tarping protects the house’s interior until the roofing contractor permanently repairs the damage.
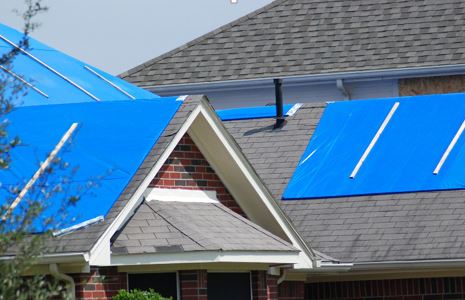
How to tarp a roof?
If the tarping of a roof is done correctly, it will shield the home from bad weather at least for up to 90 days, depending on weather conditions.
But roof tarping can be dangerous. Availing roof tarping service is propounding, but if you plan to do it yourself, here is the step-by-step guide to help you tarp the roof perfectly. Before you begin, you should take pictures of all the mangled areas both inside and outside the house for insurance purposes.
Gather the essentials
If you plan to get the roof tarping service, make sure you are fully geared with the necessary tools and equipment before getting your hands on.
If hiring a professional, the affordable roofing pro will carry all the essential items required to tarp, and if not, you need to gather below-mentioned essentials:
Things you need:
- Brush
- Measuring Tape
- Tarp (Silver or Blue)
- Gloves
- Hammer
- 2 x 4 Wooden Boards/ Planks (4-5 pieces)
- Cap nails about 3 ¼ inches long
- Drill
- Screw gun
- Ladder
- Waterproof sealant (optional)
Tarp Quality
- The tarp should extend the damaged area by at least 3′ inch on each side and the ridge.
- Thicker the tarp, better the protection
- If the tarp has UV inhibitors, it will be helpful if the repair takes longer than planned.
Prepare Yourself First
Tarping a roof is a repair project for which you need to hire a professional for Emergency Roof Tarping services texas. For any reason, you do not get the tarping done by the professional, and the situation requires swift action. Consider doing the project with some assistance and proper tools (mentioned above).
Roof tarping can be menacing. Make sure you wear rubber-soled boots though you should avoid walking on steep roofing material without safety harnesses.
Other essentials would be a helmet, thick gloves, protective glasses, a non-slip ladder to climb the roof, and a helper to help get things in place.
Assess the damage
Before you start with the tarp installation, you should precisely assess the damage before purchasing the supplies.
How do you know if the roof is damaged after a storm has passed? Identifying the exact spot can be difficult if an obvious deformity is not distinguished.
Examine the roof with binoculars first. Even a tiny amount of damage can harm the surface of your roof, deteriorating over time.
Check the inside of your attic space or find leaks and water marks along the ceiling. Climb up to your roof using your ladder but be careful as the surface may be unstable. First, clear the debris using a broom. Remove branches, leaves, and other debris to have a better view of the damage.
To evaluate the roof’s condition, look out for:
- Missing or broken shingles
- Broken tiles
- Dented metal roofs
- Missing metal roof panels
- Roof indentations
- Water spots
- Any other home damage
There may be more than one area of damaged roof or the roof may have a large hole too. You may need a plywood board and screws to cover the spot before you tarp the roof to avoid water pooling on the tarp.
You may have to remove all the roofing for a low-pitched roof just to track down the issue.
- Measure the area precisely.
Using the measuring tape, you can precisely measure the dimensions of the damage. Clicking pictures of the damaged area is advisable as it makes it easier to claim your home insurance. Buy a tarp bigger in size than you actually need with a 4′ overhang.
- Unroll the tarp
Tarps come as either folded sheets or as a roll. With the help of your family member or friend, find the corner of the tarp and firmly grasp the same. Partially unroll or unfold the tarp to cover the damaged section. As you both move away from each other, grabbing an opposite end, the tarp will unroll naturally.
Do not tarp the roof during a stormy day. Once unrolled, a tarp must shield the damaged area offering 4 feet of overhang from the roof’s peak.
- Position the tarp
For positioning, create an anchor board with 2×4 inch board, then nail the tarp on it with 3 ¼ inch nails. The board should be 2 feet longer than the width of the tarp.
Sandwich the tarp with two 2×4 anchor boards and nail those together with cap nails.
Fasten the board to both the roof’s edges with the screw just on the peak side perpendicular to the anchor board.
This step is essential as this keeps the tarp fully protective and tight. Repeat the above steps thrice for the tarp’s remaining peak ends. This holds the tarp tightly to the roof, keeping water out.
- Secure the tarp
All edges of the tarp must be secured to prevent flapping or else it will not effectively prevent further damage to your home.
Once you place all the boards, screw the rolled 2×4 boards with the screw gun. The screws must firmly pass into the roof.
Also, secure the excess roof tarp to the 2 x 4 board to prevent any water from blowing underneath the tarp.
How to Tarp a Roof Without Nails
You need to follow the above-mentioned steps but then instead of nailing the tarp, wrap the tarp along with the board three times at the edges. Repeat the same process at other boards too, while placing the adjacent board.
Tarping a roof is a pro tem fix offering you more than enough time to get the roof repaired by professionals back to its original state.
Caution
- Do not climb up on the roof during bad weather.
- Do not stand on a slippery or steep roof.
- Do not stand on the tarp on the roof, particularly when it’s wet.
- Do not stand on a damaged roof as it can be shaky.
Installing a roof tarp is no complicated process, but one should abide by safety habits all the time.
Please note, a compromised roof will surely encounture water filtration that eventually results in leakage which calls for an emergency roof tarp service.
General causes of emergency roof repairs are:
- Strong winds
- Lightning strikes
- Harsh weather
- Fire damage
- Fallen trees
Though all roof repairs should be considered urgent to that of other home repairs, few instances could end up causing a structural hazard. The need may also arise if it is a stormy evening and you, not being a professional, cannot withstand the condition. You need to call a professional for an emergency roof tarp service.
Wrapping Up
Always be prepared and keep the basic materials handy to remediate water damage quickly. Roof tarping is a temporary solution to protect the home from damage. It is always advisable to get the roof inspected and repaired by a professional to avoid further damage inside your home.